
Chapeau guide
Chapeau is a page layout app for print projects: cards, flyers, menus, zines, programmes, rulebooks. A project can be a single page or run to many. It runs in your browser and saves your work there as you go. When you are ready, you can create a PDF at the physical size you designed.
You only need two ideas to get started:
- Text is written in Markdown.
- Page sizes, margins, positions, and gaps are measured in millimetres.
Start a project#
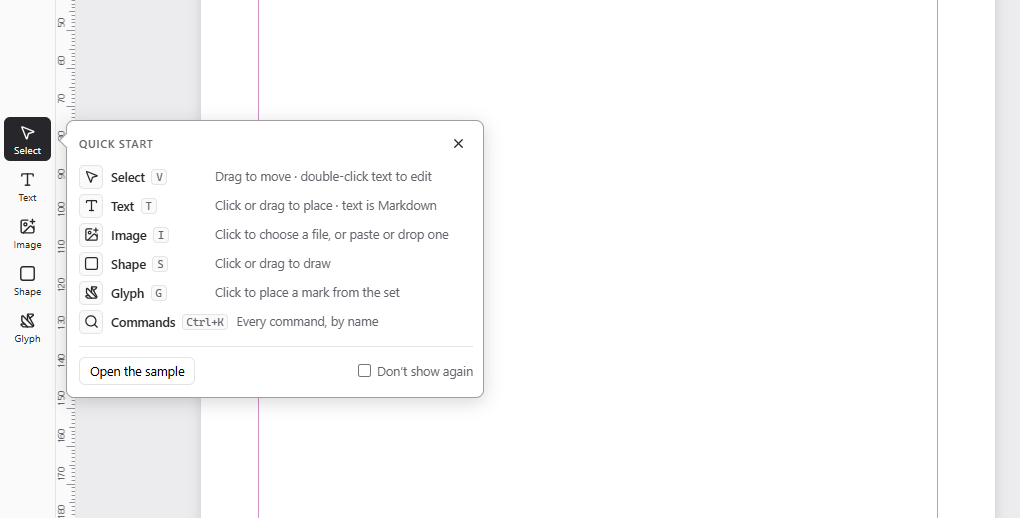
The first time you open Chapeau, you will see a blank page and a quick-start card beside the tools. It identifies the main tools and their shortcuts. You can dismiss it for the current session or select Don't show again. To bring it back later, open and choose .
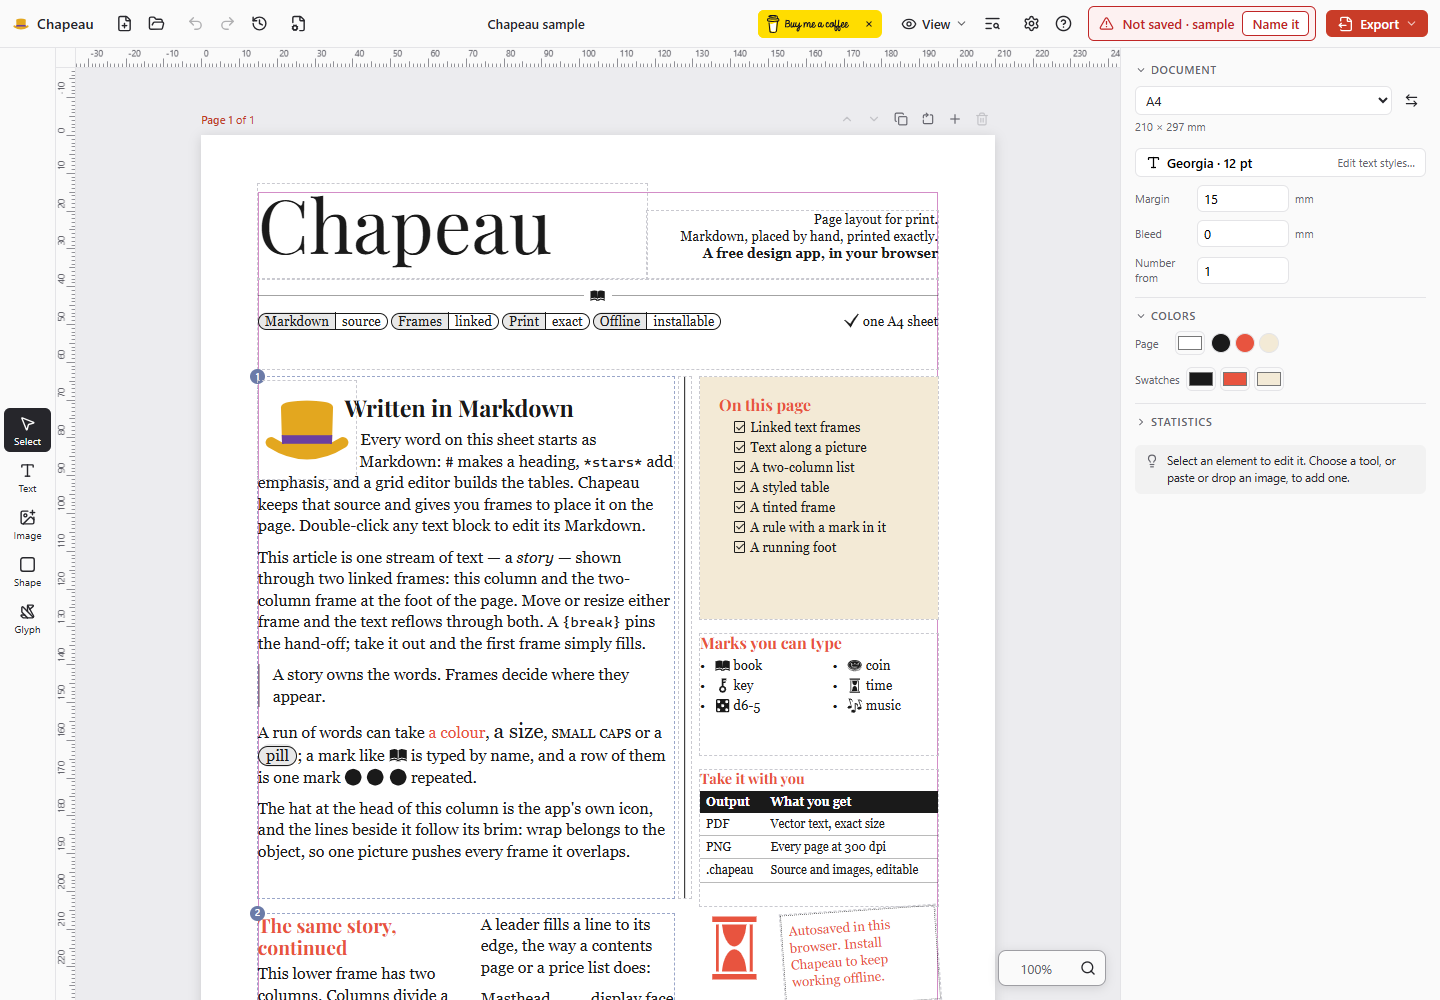
If you prefer to learn from a finished layout, choose . The sample is a normal editable project. Move its blocks, edit its text, and inspect its settings without worrying about breaking anything.
Use for a blank project. Use to return to a
project saved in this browser, open a .chapeau file, or create a fresh copy
of the sample.
Choose a tool#
The five tools sit in a column at the left edge of the window. Click a tool, then
click the page for a useful default size or drag to set the size yourself.
The tool remains active until you press Esc, press V, or choose
.
| Tool | Key | Use it to |
|---|---|---|
V |
Select, move, resize, and edit items. | |
T |
Place a text block. | |
I |
Choose and place an image. | |
S |
Draw a shape or line. | |
G |
Place a symbol from the built-in set. |
Press Ctrl+K to open the command palette. Type part of an action, then press
Enter.
Arrange the page#
With active:
- Drag an item to move it.
- Drag a corner to resize it. Drag the right or bottom edge to move only that edge.
- Hold
Shiftwhile resizing an image to change its proportions. - Hold
Altwhile dragging to leave a copy behind. - Hold
Ctrlwhile dragging to ignore snapping. - Use the arrow keys to move by 1 mm. Add
Shiftfor 10 mm, orCtrlfor 0.1 mm. - Drag the handle above an item to rotate it. Hold
Shiftto turn in 15° steps. - Shift-click items, or drag across an empty part of the page, to select more than one item.
Items snap to page edges, the page centre, margins, guides, and nearby items. A line appears when an edge or centre is aligned.
Copy items with Ctrl+C, cut them with Ctrl+X, and paste with Ctrl+V —
including into a different document, or a second Chapeau tab. Pasted items
keep the positions they were copied at, pulled back onto the page if they came
from a larger one, and a paste that would land on top of the original steps
aside so you can see it. Right-click an empty part of a page and choose
Paste to put them at that point instead. A copied picture travels by
reference to the image already stored in this browser, so pasting into a
different browser or on another machine will not bring it: use a .chapeau
file to move work between machines.
Turn on rulers in , then drag from a ruler onto the page to place a guide. Drag a guide to move it, or drag it off the page to remove it. Guides appear on every page and do not print. The same menu turns guides and snapping on and off.
The properties panel has alignment buttons. With one item selected, they
align it to the margins; hold Shift for the page edge instead. With several
items selected, they align the items to each other, and two more buttons
spread three or more items evenly.
Use Ctrl+D to duplicate, Delete to remove, and Ctrl+Z to undo. The [ and
] keys move an item down or up through the stack. Add Shift to send it all
the way to the back or front.
To see what you have changed, press beside Undo. The list opens on the left, newest change first. Point at a change to outline the items it touched, and click one to go back to it. The list starts again when you reload the page or open another project.
Right-click an item for actions that apply to it, including duplicate, layer order, flip, link, lock, hide, delete, and moving between pages.
Use the properties panel#
The panel on the right changes with your selection. It contains the selected
item's position, size, rotation, opacity, colour, border, and other relevant
settings. Changes to number fields preview while you type. Press Esc to
leave a field and return keyboard shortcuts to the page.
When nothing is selected, the panel shows document settings. You can also open it directly with . This is where you set the paper, orientation, margin, output, page colour, document colours, and page numbering.
The paper list is grouped by family — ISO A sizes, North American, square, and cards — and the millimetres under it always say which sheet you are on. The button beside it swaps the width and the height, which is all "portrait" and "landscape" ever meant. Pick Custom… to type a size instead: the two boxes then are the page, and a side can be anywhere from 20 to 1200 mm.
Changing the paper never loses anything on it: margins and guides are pulled back onto the smaller sheet rather than dropped, and one press of undo puts the whole change back.
Made for says where the document is going: Screen, Home printer, or Print service. It changes nothing on the page. It sets the resolution pictures are checked against before printing — 96, 150, or 300 dpi — and whether you are warned about artwork reaching the edge of a page with no bleed, which only matters where something is cut. Choose Print service for anything going to a print shop or a print-on-demand book.
Bleed is for pages that get cut. Set it if any colour or picture is meant to reach the edge of the finished page: the paper grows by that much on all four sides, a line marks where the cut falls, and you extend the artwork out to the new edge so the trim never leaves a white hairline. 3 mm suits most printers, and print-on-demand services usually ask for 3 mm or 0.125 in. Nothing about the page moves — positions are still measured from the corner of the finished page, so art that bleeds off the left edge sits at -3 mm — and dragging an item near the edge now snaps to the bleed as well as to the page. Leave it at 0 if you are printing at home and not trimming; the page then looks and prints exactly as before. Keep text inside the page: anything in the bleed area is cut away.
New project asks the same question with more room. The paper list is there in full, and beside it the sheet is drawn to scale with its margin inside — with A4 dashed over the top for comparison, so a poker card and an A1 are sizes you can see rather than numbers you have to picture. The margin and the output are set there too, and the document opens with them.
Write and format text#
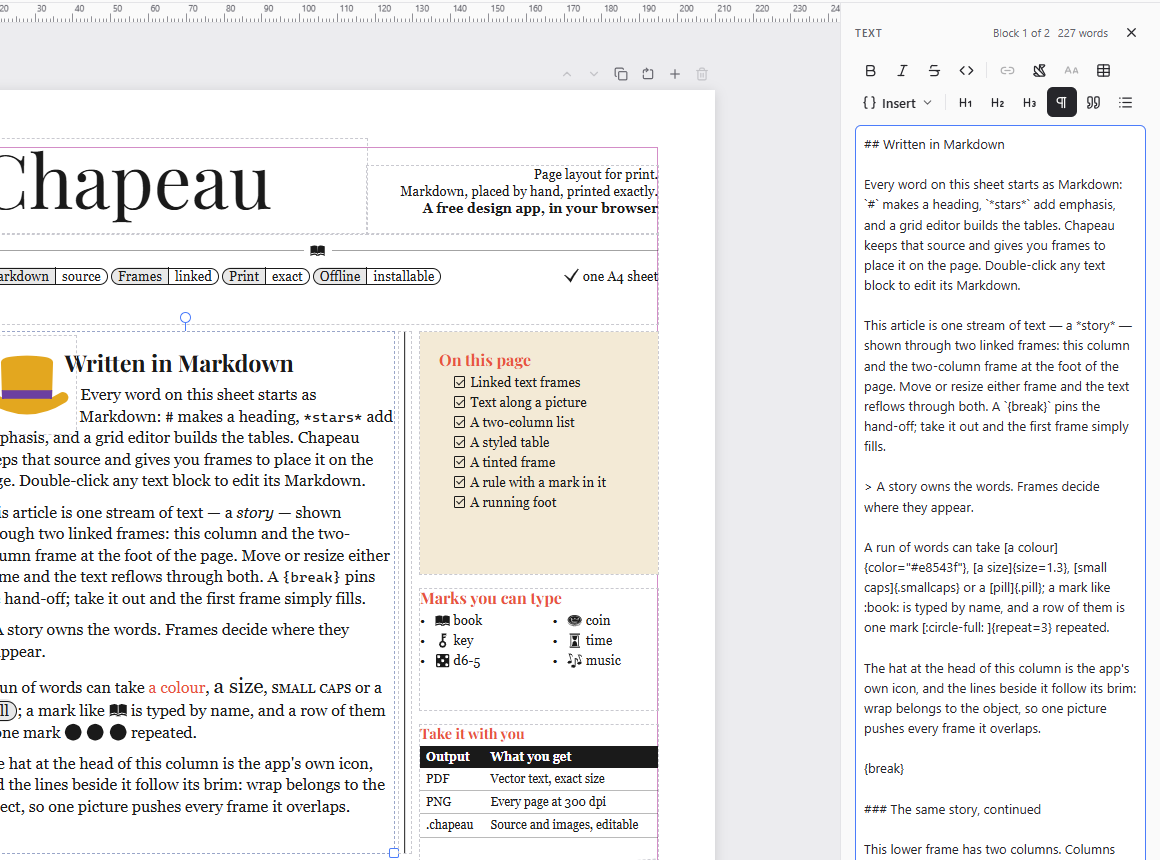
Place a text block, then double-click it to edit. Chapeau stores the Markdown you type and shows the formatted result on the page. Double-click on a particular paragraph and the editor opens with the caret already in it, which saves hunting through a long story for the part you were looking at.
# A heading
## A smaller heading

Body text with *emphasis*, **strong text**, ~~strikethrough~~, and `code`.

- A bulleted list
- Another item

1. A numbered list
2. Another item

> A quotation

[A link](https://example.com)

| Item | Cost |
| --- | ---: |
| Rope | 1 gp |
A single newline creates a line break. Raw HTML is shown as text rather than rendered.
The formatting controls above the editor can add Markdown around selected text or change the type of the current line. You can still edit the resulting Markdown by hand.
To style a run of words, select it and choose . The
selection can take its own font, colour, and size as a multiple of the
surrounding text. It can also use small caps, sit in a pill-shaped box, or
stay on one line. The result is written into the Markdown, for example
[Players 3 to 5]{.pill}.
Tables#
You can type a Markdown table yourself or choose in the text editor. The table editor lets you add rows and columns, set column alignment, and edit cells. The result remains ordinary Markdown.
| Item | Cost |
| --- | ---: |
| Rope | 1 gp |
| Torch | 2 cp |
The second row separates the headings from the contents. The colon in ---:
aligns the Cost column to the right.
Import a Markdown file#
Drop a .md file anywhere in the app to place its contents in a new text
block. Draft in another editor, then drop the file in when it is ready.
Find and replace text#
Ctrl+F opens the find bar over the canvas. It searches every text block in
the project and lists each match with the page it sits on; select a row to put
the caret on that match. F3 steps to the next one and Shift+F3 to the
previous, from anywhere — including while you are typing.
The search reads the Markdown source rather than the finished page. cols
finds {list cols=2}, and a phrase split by **bold** does not match at all.
Ctrl+H adds a replacement field, and every row then previews what it will
become. Replace writes the current match and moves to the next; Replace all
writes every match in the project, which Ctrl+Z takes back in one step.
Matches inside a locked block are left alone. Replacements are written into the
source too, so replacing {ruling=thin} with {ruling=thick} changes every
table that uses it.
Set consistent text styles#
Select in the document panel to control headings, body text, quotations, lists, code, and tables across the whole project.
The Start from row applies a complete preset: Default, Horror, Fantasy, Dark, or Sci-Fi. A preset is a starting point, and every setting can be changed afterwards.
Each block type can have its own font, size, weight, colour, alignment, and spacing. You can also keep a heading with the paragraph below it, choose list bullets, and control whether long tables split between rows. The font picker offers common system fonts and a searchable collection of Google fonts.
Use the settings for a single text block only when that block needs to differ from the rest of the project.
Flow text through blocks#
A story is a continuous piece of text that can run through one or more blocks. To continue text somewhere else on the page or on another page:
- Select the first text block.
- Choose .
- Click the next text block.
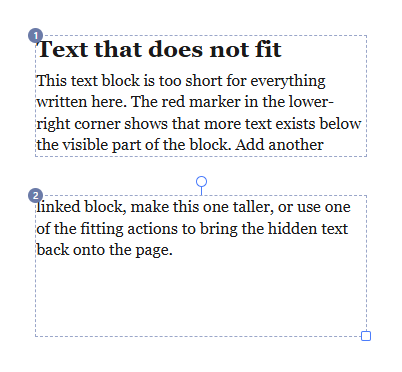
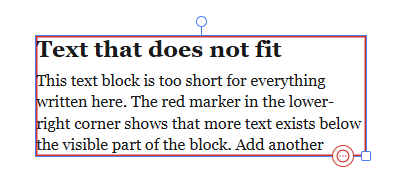
Repeat the process to extend the story. When you resize a linked block, the text redistributes through the chain. A red overflow dot on the last block means some text does not fit. Click the dot for the three ways out: Show what does not fit opens the editor at the first hidden character, Shrink text to fit reduces the story's type until it fits, and Fit block to text grows the block instead.
For columns in one rectangular area, set the block to two, three, or four columns in its properties. Use linked blocks when the text areas have different positions or appear on different pages.
If text does not fit, use one of these actions from the text block's panel or right-click menu:
- reduces the story's text size until it fits, down to 6 pt.
- changes the block's height to match its contents, up to the page edge.
The Statistics section in the panel shows the story's word, character, and block counts.
Add pictures, shapes, and glyphs#
Add a picture by pasting it, dropping it into the app, or using . A click places the image at its natural print size. A drag creates a box at the size you choose.
Images keep their proportions while resizing. Hold Shift if you need to
stretch one. The properties panel includes flipping, , and the
effective DPI at the current size. A low-DPI warning means the image may look
soft, and the number it is held to comes from the document's output — 96 dpi
for a screen, 150 for a home printer, 300 for a press.
Turn on text wrap for an image or shape when nearby text should flow around it. Set the gap and choose which side can hold text, or make the text continue below the object.
Use for rectangles, ellipses, diamonds, stars, blobs, and horizontal or vertical lines. Shapes can have a fill, border, skew, and transparency.
Use for symbols such as shields, dice, books, and potions.
Search by name in the glyph picker. You can also type a glyph in text, for
example :shield: or :dice:. A placed glyph can be flipped horizontally or
vertically, and keeps its proportions while resizing.
Work with pages and layers#
The controls above each page let you , , reorder it, turn it sideways, or . The margin shown on the page helps with alignment but does not print. The page background colour does print.
Open and enable for page thumbnails. Click a thumbnail to jump to that page, drag thumbnails to reorder them, or drag an item onto a thumbnail to move it there.
The right-click menu can move or copy selected items to another page. It can also copy an item to every other page, for headers, footers, and logos.
Two view options help with larger projects:
- hides other pages from the workspace. It does not change printing.
- places pages side by side as spreads.
The zoom control in the lower-right corner sets the view scale. Choose Fit
page (Ctrl+0) to see the whole page, Fit width, or a percentage
(Ctrl+1 is 100%).
Open and enable to see the current page's stack. Drag rows to reorder them. Use to prevent changes to an item, or to exclude it from print. A locked or hidden item has a badge on the page that lets you restore it.
The area around the page is a pasteboard. Items left there remain available in the project but are clipped from the printed page.
Insert fields and layout marks#
Fields change according to the document or page. Type them into any text block, or choose them from while editing.
| Field | Result |
|---|---|
{page} |
The number of the page containing the block. |
{pages} |
The total number of numbered pages. |
{name} |
The project name. |
The Number from setting in the document panel chooses the first numbered page. For example, set it to 2 when the cover should be unnumbered and the next page should be page 1.
Layout marks control spacing and breaks without adding visible instructions to the finished page.
| Mark | Result |
|---|---|
{hline} |
Draws a horizontal rule. |
{break} |
Starts the next column or linked block. |
{vspace=10} |
Adds 10 mm of vertical space between blocks. |
{hspace=10} |
Adds 10 mm of horizontal space within a line. |
{hfill char="."} |
Fills the rest of the line with the character, for dot leaders. |
{keep} |
Prevents the block from splitting between columns or linked blocks. |
{keep-next} |
Keeps the current block with the next one. |
{dropcap=3} |
Makes a drop cap three lines high. |
{list cols=2} |
Sets the following list in two columns. |
{ruling=bold} |
Sets the rule style of the table below: normal, discreet, or bold. |
The menu also contains useful punctuation and symbols that may be hard to type on your keyboard.
Save and export#
Chapeau saves the current project in your browser as you work. This protects against closing or reloading the tab, but it is not a substitute for keeping a project file somewhere you control.
Open and choose , or press Ctrl+S,
to create a self-contained .chapeau file with the document and its images.
Open that file later with or drop it into the app.
Use to keep named restore points before a major edit.
If your browser could not save your latest changes when you open or start another document, Chapeau keeps them as a snapshot of the document you left, listed under it in . When it cannot keep them either, it asks before you leave.
Create a PDF or PNG#
Open and choose , or press Ctrl+P.
Chapeau checks for overflowing text, low-resolution or missing images,
unavailable fonts, items outside the page, and artwork that reaches the edge
of a page with no bleed set, before opening the print dialog. Two of those
checks follow what the document is Made for: the resolution a picture is held to,
and the warning about the cut, which a screen document never gets.
In the print dialog:
- Choose Save as PDF as the destination.
- Set scaling to 100% or Actual size.
- Check the page preview, then save.
Do not use Fit to page. It changes the physical size of the layout.
With a bleed set, the PDF comes out at the page size plus the bleed on every side — an A4 page with 3 mm of bleed saves as 216 × 303 mm. That is the file a print service wants. To print it on your own printer instead, use a sheet larger than that and still keep scaling at 100%.
Choose to create PNG files. You can export all pages, the current page, or a page range. A PNG is always the finished page without the bleed, since it is something to look at rather than something to trim.
Fonts and offline use#
A font is kept for later use after it has loaded once. If you plan to work offline, open the project while connected first and check that every font appears correctly.
You can install Chapeau from your browser and use it offline. There is no
account. Keep .chapeau files as backups for work you care about.
Keyboard shortcuts#
Open for the complete, current shortcut list. These are the ones most people need first:
| Key | Action |
|---|---|
V T I S G |
Select the five main tools. |
Ctrl+K |
Open the command palette. |
Ctrl+Z / Ctrl+Y |
Undo or redo. |
Ctrl+D |
Duplicate the selection. |
Ctrl+C / Ctrl+X / Ctrl+V |
Copy, cut, and paste items — including into another document. |
Ctrl+B / Ctrl+I |
Bold or italic in the text editor. |
Ctrl+F / F3 |
Find text, and go to the next match. |
Ctrl+H |
Find and replace text. |
Ctrl+0 / Ctrl+1 |
Fit the page in the window, or zoom to 100%. |
Ctrl+S |
Save a project file. |
Ctrl+P |
Create a PDF through the print dialog. |
[ / ] |
Move the selection down or up in the stack. |
Esc |
Leave an editor or field, cancel a tool, or close the current panel. |
Fix common problems#
Text is missing from a block. Look for the red overflow dot on the last block in the story and click it — it offers to show you what is missing, to shrink the text, or to grow the block. You can also make the block larger by hand, link another block, or use or .
An item will not move. It may be locked. Select its lock badge on the page or unlock it in .
The PDF has the wrong size. Export again and set print scaling to 100% or Actual size.
A picture may print poorly. Check its effective DPI. Make it smaller on the page or replace it with a higher-resolution image.
A drop cap sits on the words beside it. This happens when the top edge of a wrapped picture lands on the first line of that paragraph. Move the picture up or down by a line.
A font changes while offline. Reconnect, open the project, and wait for the font to load before going offline again.
You need an older version. Check first. If needed,
open an earlier .chapeau file.